0% Interest and Travel On Us For A Limited Time!

Limitations Apply

winterize the lithium power system

How To Winterize Your Vandoit Campervan: Maintaining the Lithium Battery System During Cold Weather

How To Winterize Your Vandoit Campervan: Maintaining the Lithium Battery System During Cold Weather Read More »

Winter is coming. For some parts of the country, winter weather has been here for weeks. This means you should be taking some steps towards winterizing your van. This guide will show you how to winterize the lithium battery system for all types of van users

Confirmed Issue: The Mastervolt lithium system is designed to operate during cold weather. However, cold weather can impact the operation of the lithium electronic system. Symptoms include batteries not accepting a charge current, CombiMaster Inverter not turning on, Mastervolt Control Panel not turning on, AC and/or DC power not working, and not charging from the alternator. 

The purpose of this article is to educate you about how your lithium system operates in cold temperatures. It includes measures you can take to preserve the health of the system and protect your investment.

Affected Units: Any Vandoit van with a lithium battery system 

Note: Vans built after September 2021 have a heating pad installed on the lithium battery/ies. The heating pad is hard-wired to the battery system and will automatically turn itself on at 45°F. It will also turn off when the battery temperature reaches 68°F. The heating pad should prevent the battery/ies from becoming too cold to operate.  However, as explained below, the operating temperatures of other parts of the lithium system can impact the system’s ability to function.  Specifically, the CombiMaster Inverter/Charger shuts off at a higher temperature than the batteries do. When it shuts off, the heating pad will gradually deplete the battery bank. If the CombiMaster shuts off, the battery level can be restored/maintained by driving the vehicle regularly.

Maintaining The Entire Mastervolt Management System

Issue Explanation: To begin, what one first needs to understand is that maintaining your lithium system does not solely include the batteries, but the entire Mastervolt management system.

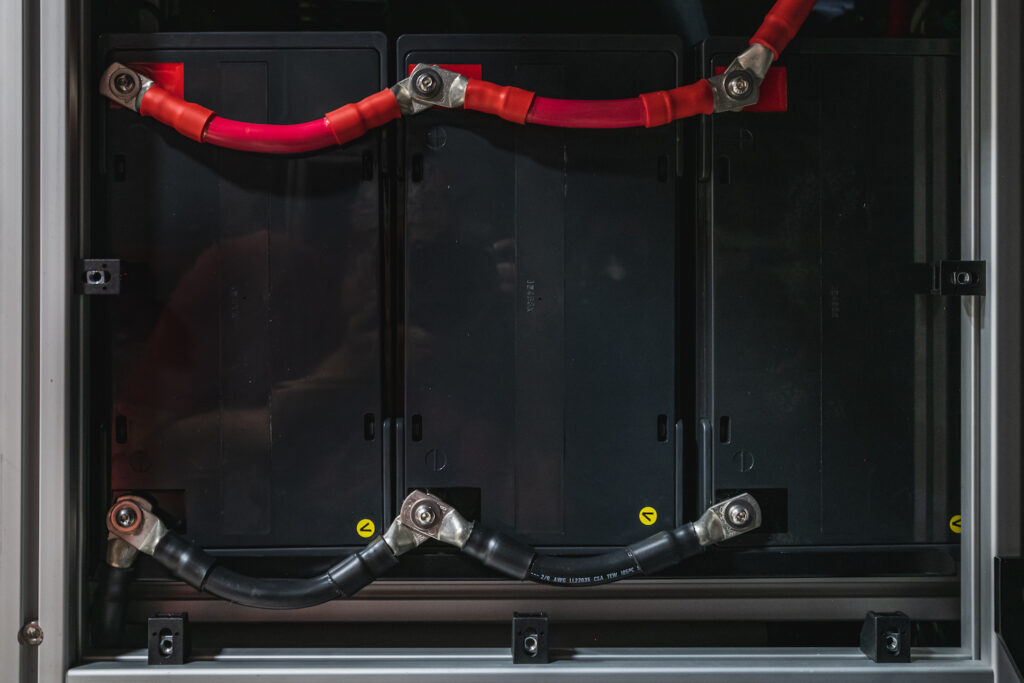
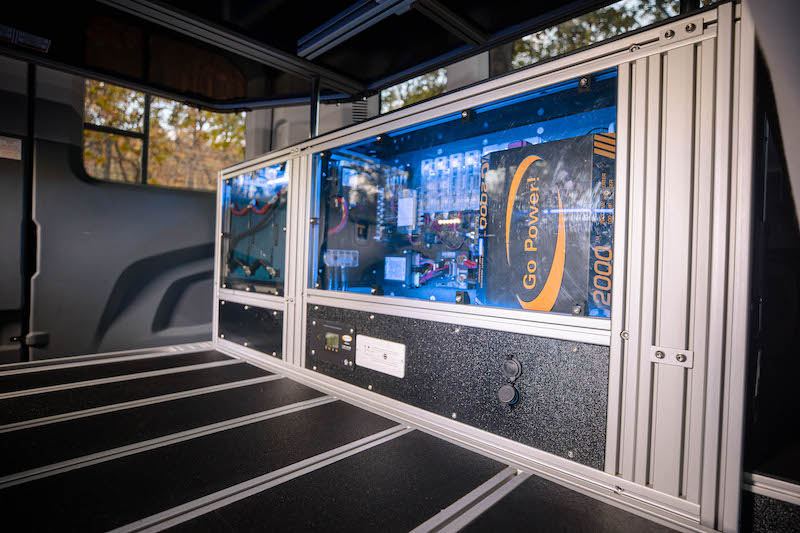
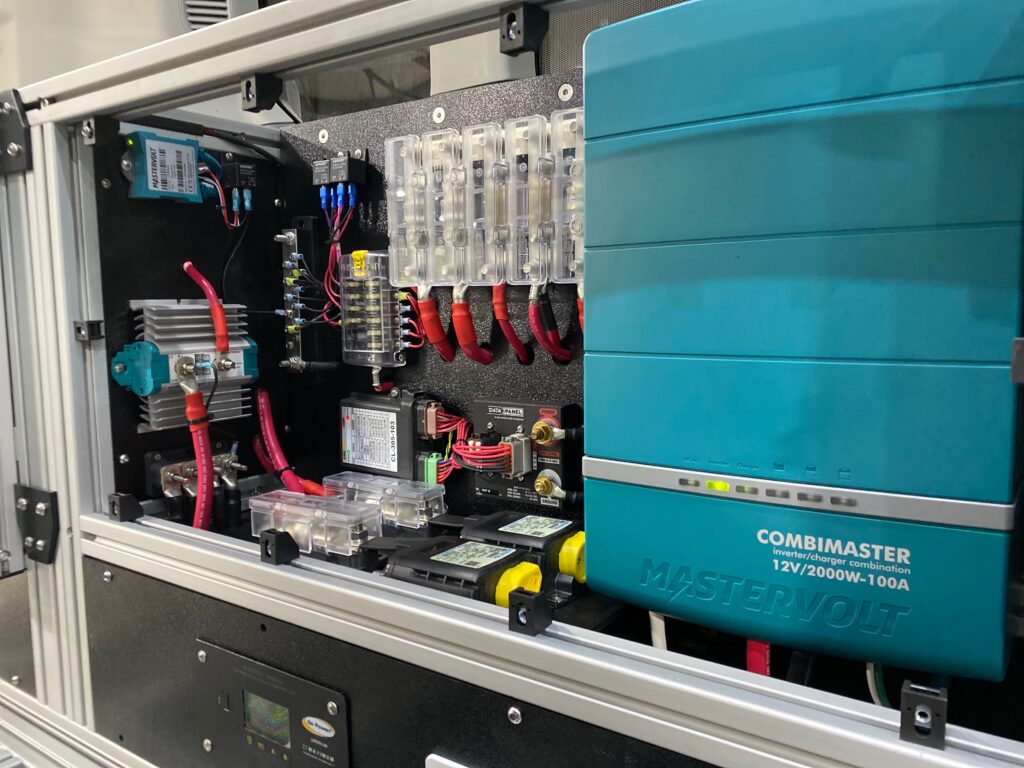
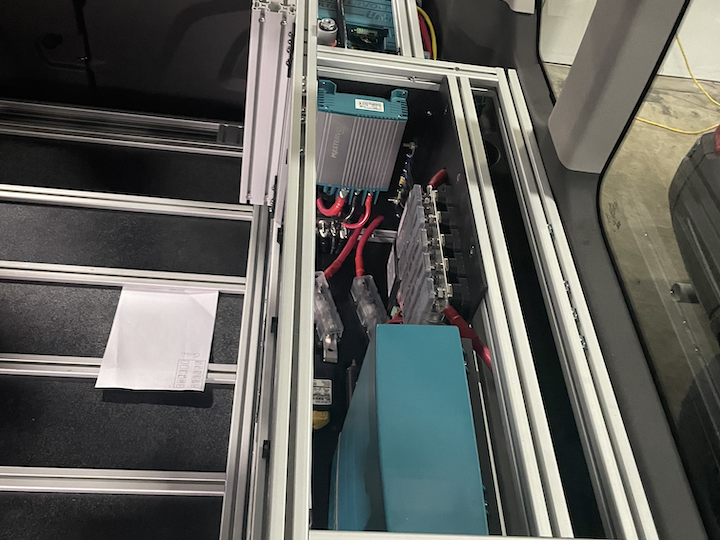
The Mastervolt system employed in your van includes the Mastervolt CombiMaster 120V series (Inverter/charge controller), ML-RBS Remote Battery Switch (controls flow of power in and out of the battery),  Mac Plus (Charges from alternator), and MLI Ultra 12/2750 or 5500 Lithium Battery Series (Lithium Batteries). Each of these components has a different operating temperature:

Component Operating Temperatures:

  • CombiMaster:  14°F to 140°F  <— (Highest Threshold Temperature)
  • ML-RBS Remote Battery Switch: 14°F to 140°F
  • Mac Plus: -4°F to 140°F  
  • MLI Ultra Lithium Battery: -13°F to 122°F

Please note that these operating temperatures are distinct from the ambient temperature of the air in the van.

Note: Depending on what charge cycle the batteries are in, attempting a charge below 23°F may result in batteries not accepting charge current, but this does not mean the batteries are not operational or in danger of damage. The batteries are safe as long as they are above -13°F.

Because the CombiMaster (not the batteries) has the highest threshold for operating temperature, you will need to consider how you plan to utilize the van over the winter with this device in mind. Should the internal temperature of the CombiMaster go below operating temperature, your van will not be able to charge via shore power (which gives the impression that batteries may be damaged, but this should not be the case), the Mastervolt control screen may go blank, and AC power will not work.  To bring the CombiMaster up to operating temperature, run the Espar heater (DC powered) or the Ford factory heater.

Secondly, the battle you are fighting, so to speak, is with battery discharge, not with cold.  Keeping your batteries at a high charge is key in all situations.  It is important with all setups and temperatures (hot or cold), to eliminate loads from both DC and AC-powered devices, as this eliminates power draw from the batteries.  Higher power draw increases the use of battery cycles, which decreases the life of the battery.  In summary, keeping your batteries fully or nearly fully charged and limiting power loads helps in all scenarios, not just cold temperatures.

Resolution: The approach to maintaining your lithium battery system during cold weather will depend on how long your van will go unused. Please find the approach below that best fits your time frame: 1) you will be driving the van daily, 2) the van will be unused for a short term (1 to 2 weeks in between uses), or 3) the van will be unused for a long term (2 weeks or more–van needs to hibernate with only necessary functions running). 

Please note that these approaches–minus running the Espar heater or a space heater–may be used to maintain the lithium battery system in warmer weather conditions as well.

Winterizing For Daily Driving

1. Drive the van daily to maintain 80%+ state of charge on the battery system.  A good rule of thumb for most van owners is approximately 1 hour of drive time will provide roughly a 20% increase in charge.  These numbers will vary depending on what devices are turned on and drawing power in the van.

Note:  Mileage/vehicle runtime needed to get the battery to 100% state of charge will vary.

2. When the van is parked, keep it plugged into shore power.  This will give you a reliable charge until temperatures drop to the 14°F mark.

3. Run the Espar heater or a safe space heater inside the van to keep the batteries at an internal temperature of 23°F or warmer to accept a charge.  (See step 4 in the next section for instructions on how to check the battery’s internal temperature.) 

Note: Be sure that your gas tank has at least 1/4 tank of gas while running the Espar and the run time is set so that it will continue to heat the van until the next time you drive it.  Electric space heaters will drain batteries very quickly when not plugged into shore power.  Always double-check how much power you are using before leaving the van unattended.  (You can accomplish this by viewing how many negative amps are displayed in the “Primary Current” box on the Mastervolt screen.)  Ensure that you have enough stored power or that shore power is plugged in and charging.

4. Vans built after September 1, 2021 have a battery heating pad installed. The heating pad is hard-wired to the battery system and will automatically turn itself on at 45°F and turn off when the battery temperature reaches 68°F. Because the heating pad is hard-wired directly to 12 volt power, you can turn off the inverter and still keep the battery warm.  However, the heating pad is another device that will be powered from the battery. Expect a higher amperage draw from the battery when the heating pad is connected and functioning, which means faster battery discharge.

Winterizing A Van That Is Used 2 Days To 2 Weeks

1.  Keep the van plugged into shore power.  Again, this will give you a reliable charge until temperatures drop to the 14°F mark.

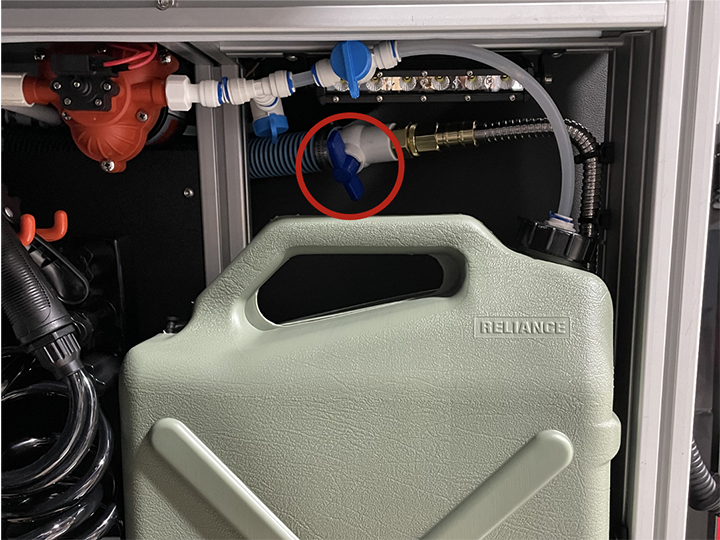
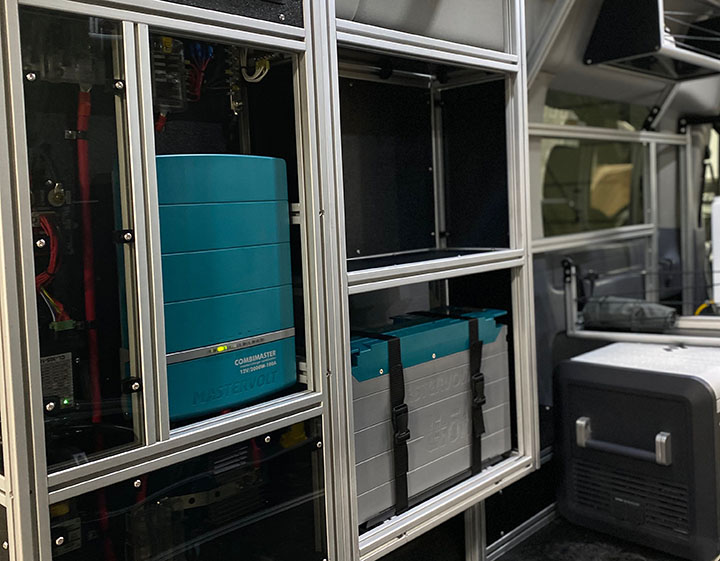
2.  Remove the black ABS panel from above the inverter and keep it off so it can stay warm from the van’s ambient temperature.  You will ned a 5mm Allen wrench to remove the screws in the panel.  To do this in a LIV model, remove the bed or raise it as high as possible to allow sufficient room.

DO model

winterize the lithium power system

LIV model

winterize the lithium power system

3.   Run the Espar heater  or a safe space heater inside the van to keep the batteries at an internal temperature of 23°F or warmer. 

Note:  Be sure that your gas tank has at least 1/4 tank of gas while running the Espar and the run time is set so that it will continue to heat the van until the next time you drive it.  Electric space heaters will drain batteries very quickly when not plugged into shore power.  Always double-check how much power you are using before leaving the van unattended.  (You can accomplish this by viewing how many negative amps are displayed in the “Primary Current” box on the Mastervolt screen.)  Ensure that you have enough stored power or that shore power is plugged in and charging.

4.  Every 2-3 days, check the battery’s internal temperature and battery level:  

      A. To check the internal temperature: In the  top right corner of your Mastervolt lithium monitor, look for an icon with three horizontal lines and a magnifying glass. Click the icon and it will take you to a new menu. From there, click BAT Primary. Scroll down until you see Temperature. Please note that the reading is in Celsius.

winterize the lithium power system
Winterize Lithium Power System
winterize the lithium power system

 B. To check the battery level: On the first page of the Mastervolt lithium monitor, look for the square that displays a percentage for the “Primary State of Charge.”

winterize the lithium power system

Depending on when you received you van, the first page may have different data point boxes.  If you cannot locate the correct box, contact Vandoit Customer Support.

Winterizing For Vans Unused Longer Than 2 Weeks

1. Plug the van into shore power and charge the battery bank to 100%.

2. Leave the battery/ies installed in the van; there is no need to remove them.

3. Turn the yellow RBS switches to the locked position; the word LOCKED is imprinted on the top of the black housing of the RBS.

winterize the lithium power system

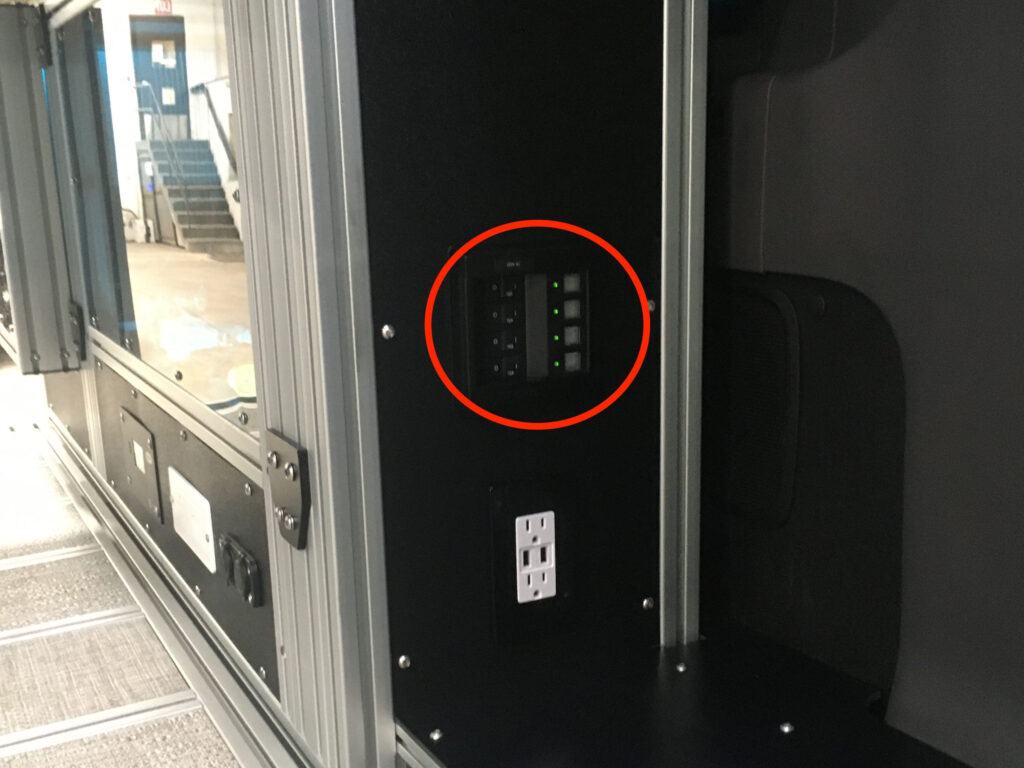
4. Turn off all circuit breakers. In the DO model, the circuit breaker panel is located on the power tower. In the LIV model, it is located on the front of the power box, behind where a 2-seat bench or kitchen pod may be installed in your van.

winterize the lithium power system

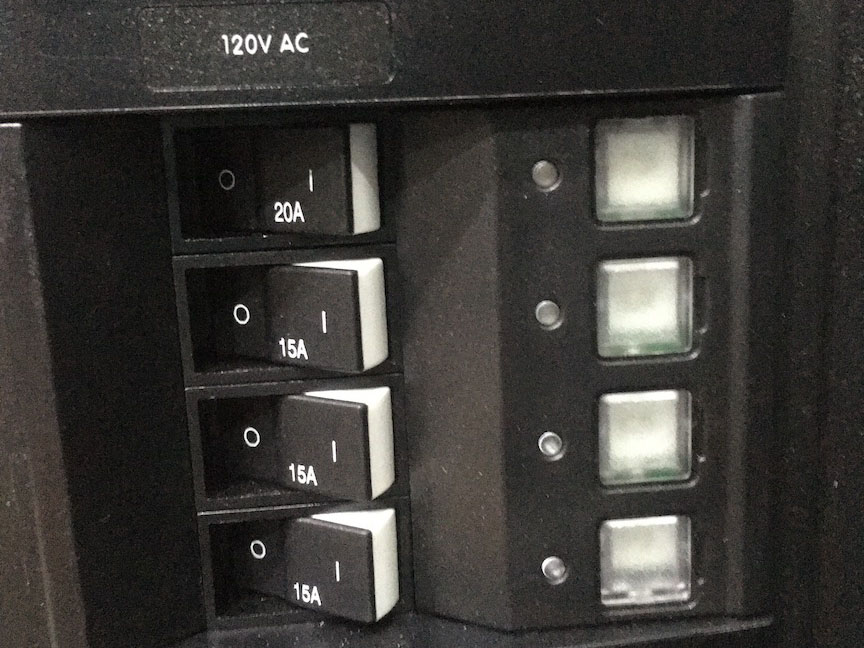
LIV circuit breaker location:

5. As often as is reasonable, check the internal temperature of the batteries and the battery level using step 4 above.

Note: Mastervolt batteries’ rate of self-discharge is less than 5% per month. Low ambient temperature affects the self-discharge rate of the batteries. Keeping batteries charged above 60% is key to their health.

To resume using your van after long-term non-use/storage:

1. Turn on all of the circuit breakers.

2. Turn the yellow RBS switches to the unlocked position.

3. Drive the van for at least 1 hour and then plug it into shore power. Driving will automatically press the top of the yellow switch(es) in to begin charging the battery. After long-term cold weather storage, we always recommend charging the battery all the way back up to 100%. Charge the batteries from either driving the vehicle or charging from shore power. 

4. After 1 hour of being plugged into shore power, use the Mastervolt lithium monitor to check the battery level. If it is lower than 80%, please reach out to the Vandoit Customer Support team by submitting a ticket through the Customer Support portal or emailing [email protected] . Please include photos of each page of the Mastervolt screen.

Other Important Notes:

  1. If you will be storing your van long-term in an area where temperatures reach -13°F or below, refer to this article: Removing Lithium Batteries for Long-Term Cold Weather Storage.
  2. If your Mastervolt batteries reach a critically low level and the Mastervolt monitor displays a “Battery Safety Mode” message, stop and immediately contact Vandoit Customer Support.
  3. If you experience any issues with maintaining your lithium system in cold weather, please reach out to the Vandoit Customer Support team by submitting a ticket through the Customer Support portal or emailing [email protected].  Please include a description of how the system is performing and any relevant photos and videos of the Mastervolt screen and system components.

Was your van delivered before September 2021 with a lithium battery system?  Are you experiencing issues with the system functioning during cold weather? Your van may be a candidate for needing a heating pad that can be installed on the battery/ies.  Please submit a ticket to the Customer Support Team with your request for a lithium battery heating pad.  Please include whether you live in or travel to cold climates for more than a few days at a time. This will help determine if your van is a candidate for needing the heating pad.  Please also include a good shipping address where the heating pad can be sent.

Winterize Your Vandoit Campervan

How To Winterize Your Vandoit Campervan: The AGM Power System

How To Winterize Your Vandoit Campervan: The AGM Power System Read More »

Winter is coming. For some parts of the country, winter weather has been here for weeks. This means you should be taking some steps towards winterizing your van. This guide will show you how to winterize your Vandoit campervan AGM Power System

Confirmed Issue: Some van owners opt to store their vans over the winter rather than driving and using them. Long-term storage requires caring for the AGM battery system.

Affected Units: Any Vandoit van with an AGM battery system

Issue Explanation: A van that sits unused is always drawing power. Therefore, if you do not plan to use your van for a week or longer, you will want to take steps to prevent the battery system from draining so low that the batteries are in danger of being damaged.

What Steps Should You Take Towards Winterizing Your AGM Power System?

Winterize Your Vandoit Campervan

1. The best option for winterizing the AGM system is to keep the van plugged into shore power in a location where the rooftop solar panels can receive regular sunlight; this combination will keep the AGM system fully charged. Having both will serve as a backup incase any power issues with your shore power source.

2. If keeping the van plugged into shore power is not an option, parking the van  in a location where the rooftop solar panels can receive regular sunlight is the next best option.  

Note: You may wish to purchase ground solar panels that plug into the van next to the shore power plug. Ground solar not only adds to the incoming power the van can receives, but the panels can be placed on the ground near the van or on the windshield. This option is especially helpful when the van must be parked in shade or under a covering. Contact the Customer Support team (see below) for information on purchasing ground solar panels.

3. If keeping the van plugged into shore power or accessing solar power are not options, the Vandoit AGM batteries can be disconnected by removing the power cables from the battery terminals to stop the draw of power (This may require removing a panel from the power box using a 4mm Allen wrench).

Note: Make sure shore power is disconnected and the vehicle is turned off before removing rear AGM batteries. 

4. Disconnect the power cables from the battery terminals starting with the positive first and then the negative. The longer positive red cable should be removed and covered with electrical tape or a rubber cap to prevent contacting metal when repositioning it to get the batteries out. 

Be aware that it may take 2 people to remove the batteries safely due to their weight (approx. 60 lbs each).

Winterize Your Vandoit Campervan

5. Store the batteries in a warm, dry location such as a heated garage, and attach them to a battery tender (If batteries are only disconnected and not attached to a battery tender, they will lose up to 3% of charge per month).

6. When you are ready to use the van again, make sure it is not plugged into shore power. Detach the batteries from the battery tender and install back in the van. Then reconnect the power cables to the battery terminals the same way they were removed. Wait for the system to kick back on. Voltage readouts in the van should show around 12.8 volts. 

If the resolution steps above do not provide the direction you are seeking, please contact the Customer Support team by  submitting a ticket through the Customer Support portal  or emailing  [email protected] .

How To Winterize Your Vandoit Campervan

How To Winterize Your Vandoit Campervan: The Water System

How To Winterize Your Vandoit Campervan: The Water System Read More »

Winter is coming. For some parts of the country, winter weather has been here for weeks. This means you should be taking some steps towards winterizing your van. This guide will show you how to winterize your Vandoit campervan.

Winterizing Your Water System

When water freezes it expands. As a result, full jerry cans, water lines, water nozzles, sink heads, or hot water tanks can burst. This covers how to remove water from the van if you will not be using the van. 

It is important to note that water will freeze if the interior of your van is 32 degrees Fahrenheit or lower. If you are leaving your van for a day or two in the winter, if you use your van as a daily driver, or if you are traveling full time and want to keep water in the van, we recommend utilizing the Espar heater.

The Espar heater comes programmed to run for 12 hours. This can be adjusted up or down as needed depending on how long you are leaving the van. Important reminder: You need more than 1/4 tank of gas for the Espar to run. For those not utilizing water in the winter, please refer to the model you have below. 

Espar Furnace

Winterizing The Vandoit LIV Model

LIV models come with the water system mounted in the passenger side box. GO models may have water in the driver side box. The water system is made from a combination of a jerry can, hot water tank, and/or 10 gallon tank.

Winterizing The Jerry Can

  1. Unbuckle the green jerry can.  Empty the remaining water. 
  2. Turn on the water pump.  Spray out any remaining water from the line. Once empty, turn off the water pump. 
Jerry Can Valve

Winterizing The 10-Gallon Tank

  1. Turn the valve to open to pull water from the 10 gallon tank (Blue valve parallel with water line). 
  2. Spray all the water out of the 10 gallon tank. Make sure to look at the level window on the front side of the tank to ensure it is empty.
  3. Continue spraying the water pump to spray any water from the line. Once empty, turn the water pump off. The tank can stay in the van. 

To Winterize the Hot Water Tank:

  1. Although water was sprayed, there can still be up to 1 gallon of water left in the hot water tank. Unbuckle the hot water tank.   
  2. Unplug the hot water tank from the outlet. 
  3. Disconnect the red, blue, and back flow water lines from the top of the tank. They are hand screwed on.
  4. Remove the tank from the van and tip upside down.  
Hot Water System

Winterizing The Kitchen Pod

  1.  After doing the above steps, turn the kitchen sink on. Let all water run out of the lines.
  2. Unscrew the kitchen water line from the brass fittings.
  3. Keep brass fittings open for the winter. Should water be accidentally left in the line, we do not want water expanding and busting a closed fitting. 

Winterizing The Vandoit DO Model

The DO model equipped with the hot water module or the cold water module.

  1. Spray remaining water out of the hot water or cold water jerry can till empty. 
  2. Disconnect the waterlines where they attach to the water modules. It is okay to keep the lines connected to the kitchen pod. 
  3. Store modules in a place where they will not freeze.

*DO NOT STORE THE MODULES IN THE VAN

See this video for more information on winterizing your water system

General Maintenance On Your Vandoit Adventure Van

General Maintenance On Your Vandoit Adventure Van Read More »

If you’ve been shopping for a camper van, chances are good that you have read up on the advantages a camper van provides when it comes to maintenance, especially in comparison to the care required for an RV.  Vandoit owners often comment on how the water system is much easier to maintain and winterize than on other RVs.

To give you an idea of what to expect when you choose a Vandoit or to help maintain yours, here is Vandoit’s General Maintenance Checklist. We divided the checklist into items that require maintenance at different intervals: before each trip, monthly, every three months, every six months, and as needed.

Before Each Trip:

Water System:

Before each trip, turn on your water pump and test water flow and pressure by spraying the shower hose or turning on the kitchen pod faucet.  If the water sputters or does not work, Vandoit has published troubleshooting steps in the online Vandoit Knowledge Base, like this article for a DO model

For winterizing the water system, follow the steps in this article.

Shore Power Plug and Cord:

Before each trip, open the cap on the shore power plug to inspect the prongs.  Make sure they are not bent or broken and are free from debris.  Test your shore power cord by plugging it into a different device and checking that it receives power.

While the shore power cord is plugged into the van, check your inverter screen to ensure the van gets a charge from shore power. 

Shore Power HookUp

MaxxAir Fan:

Press the power button on the keypad and verify the fan opens and spins freely with no binding or squeaking. Check the charge level on the handheld remote by viewing the battery indicator at the top of the screen. 

Periodically check the condition of the air vent seal around the air vent on the van’s roof for leaks or damage. 

Dometic Air Conditioner:

Turn on the air conditioner and verify that the system kicks over from the fan to the cooling setting and feels cold. Let it run for 20 minutes, and then check to ensure no leaks exist around the inside flange. 

Seeing condensation from the exterior on the ground around it is normal. An external drain hose exits the roof, and condensation drains down the steepest part. If the van has a DC-powered air conditioner, check to ensure the remote’s batteries are still working. 

Espar Heater:

First, verify you have more than a 1/4 tank of fuel in your van. Nothing should be within 1 foot of the air vent on the Espar box, and the external exhaust pipe on the driver’s side should not be pinched or blocked.

Set the thermostat to higher than the ambient temperature, and press the power button. Wait a few minutes for the Espar to start and get warm. Eventually, the Espar should change to a lower fan speed or cycle off when it achieves the requested temperature. 

Inverter/Outlets (AC Power):

Turn on your inverter and test each outlet in your van with a device such as a phone charger. If any outlets are not powered, check the AC breakers to ensure there isn’t one that’s tripped. 

Gear Slide:

Test the gear slide by pulling the red release knob and then pulling it out. Verify that the gear slide moves smoothly and clicks into each catch point along the rail system. With the red knob still pulled, verify that the endpoint stoppers prevent the gear slide from going too far in or out of the van. 

LIV Bed Lift System:

Test the system by turning the handle clockwise to raise the bed. The bed should ascend evenly and not bind at any point. Spin the handle counterclockwise to verify the bed lowers evenly. (Tip: Sometimes, you may need to add a little pressure or weight on top.) 

Wipe the actuator shafts clean of any dust or debris that has built up, so they raise and lower freely. 

DO Bed System:

Ensure the black turn knobs are tight on the bed brackets attached to the skeleton. The brackets on the beds should also be secure. Make sure you have enough eyelets on the beds and they are tight. Wiggle the cargo buckles attached to the ceiling to verify they are secure.  

Factory Ford Seats: 

If you’re moving seats in and out of the van for your trip, make sure you have pull tabs on the bottom before installing. Once fully seated, test each seatbelt to ensure it feeds freely and retracts smoothly.

Every Month:

Dometic Air Conditioner:

Once a month, remove the return air filter behind the return air vent grille to make sure it is clear of debris and anything that might block airflow. 

If it is dirty, wash it with soap and water and let it dry completely before reinstalling or replacing it.  

As needed, clean the ADB (Air Distribution Box) housing and the control panel with a soft cloth dampened with mild detergent.

Espar Heater: 

Run the Espar monthly for about 20 minutes, even in warm weather.  See this article for additional recommended maintenance on the Espar heater.

Every 3 Months:

Espar Heater: 

Inspect the Espar exhaust pipe (under the driver’s side of the van) to ensure it is perpendicular to the van’s length and undamaged.

MaxxAir Fan and Dometic Air Conditioner Seal:  

Check the seals around these components every three months by viewing them from the roof of your van using a safe ladder or scaffolding.  Check for cracks or gaps in the seal.  

If your fan or air conditioner exterior flange has Flexseal, clean the existing sealant with rubbing alcohol and apply a new layer of Flexseal every three months. If gaps or cracks are visible, replace the Flexseal immediately.

If your fan or air conditioner exterior flange has Dicor Lap Seal, apply a new bead of Lap Seal if gaps or cracks are visible or if moisture leaks into the van.

Solar Panels: 

Use a safe ladder or scaffolding to inspect the rooftop solar panels.  Ensure they are clear of debris (i.e., leaves, snow, dust, etc.) to ensure maximum solar input. 

If you cannot wash the van, wipe them off with window cleaner.  

Inspect the panels for any cracks or breaks.  Broken/cracked panels will likely become problematic as the solar cells experience moisture. This will shorten the panel’s life and probably decrease its energy output.

Every 6 Months:

Battery Terminals: 

In a Vandoit van with an AGM system, visually inspect the terminals on the batteries in the power box to ensure they are securely attached.  In a Vandoit van with a Mastervolt lithium system, check the ethernet cables on the top of the batteries to ensure they are fully seated. 

Bolts in Vandoit Frame:

The bolts at the joints of the Vandoit aluminum t-track frame are M5 and M6. They may loosen over time due to movement and vibration. 

Use a low-profile ratchet wrench or a stubby L-style Allen wrench to tighten bolts. Standard sizes are 4mm, 5mm and 6mm for the bolt heads.

Once a Year:

Dometic Air Conditioner:

Once a year, check for the following:

  • Inspect the unit from the roof of the van for debris or damage
  • Wash the inner coils, including the condenser and evaporator
  • Clean drains
  • Replace gaskets and filters
  • Perform amp-draw tests

Espar heater: 

Use this article as a guide to annual Espar maintenance.

As Needed:

Battery health: 

If batteries in your Vandoit power system are not holding a charge or seem to be losing charge quickly, remove them from the rear power box in your van and take them to a local Batteries Plus or auto parts store for testing.  If recommended, replace the batteries.

Outlets:

Test the wall outlets by turning on the inverter and plugging an item like a phone charger into each outlet.

Awning: 

Ensure the awning crank handle for the Thule awning is in the van. Loosen the collar on it to lengthen the handle, and then tighten the collar to secure the handle. 

Next, ensure the crank fits up in the awning keyway, and try extending and retracting. Both movements should be smooth. Once completed, remove the crank from the awning and put it back in the van. 

A note on Ford vehicle maintenance:

Vandoit built our adventure vans on the Ford Transit for several reasons, including dealership warranty and availability, affordable maintenance and repair costs, quality, van availability, and affordability. 

For Ford vehicle maintenance, speak with your local Ford dealership or use this link to find a Ford maintenance schedule tailored to your specific vehicle: https://www.ford.com/support/maintenance-schedule/

  • One year 0% interest
  • On select units
  • Applies for 1 year on our in house lease purchase program. Interest will apply at 2 points over New York prime after one year. 
  • May be used in combination with or in lieu of other incentives
  • Minimum down payment will be required based on credit, price and other factors.
  • With approved credit.
  • “Travel On Us” All National Parks, all access free pass (1 year) may apply…ask your representative for details.